
Window Mat Insulation
Low-E Window Mat Insulation is the perfect solution for keeping you comfy inside your camper van, caravan or motorhome. No airborne fibres to worry about, indoor air quality approved, Class 1 Fire rated and won’t absorb moisture, Low-E is the perfect material for insulated window mats.
Want to get hands on with our products?
Reasons our customers use Low-E Window Mat Insulation
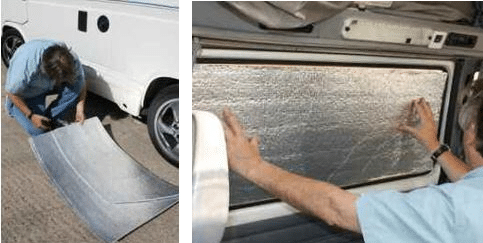
 Quick and Easy to Install
Installing Window Mat Insulation
Installing Window Mat Insulation
Low-E Window Mat Insulation is easy to cut and quick to install. Blocking out 100% of unwanted light and reflecting heat to keep you cooler in summer and warmer in winter, Low-E allows you to get a great night’s sleep!

How to Make Insulated Window Mats
Low-E Window Mat Insulation is ideal for use in campervans and motorhomes but work just as well in cars and vans. Quick and easy to cut, Low-E won’t absorb moisture and reflects 97% radiant heat. Warmer in winter and cooler in summer, your new window mats will block out unwanted light and reduce condensation risk and draughts allowing you to stay cosy and get a great nights’ sleep.
Simply follow the steps below to make your own bespoke Low-E Insulated Window Mats.
Please take the usual precautions when using scissors or a blade. When marking the insulation, be sure not to use a sharp pen that could damage the insulation. Check all measurements and markings before making any cuts. If unsure, cut your mats slightly large. You can always cut a little extra off afterwards, but you can’t add extra back on.

Step 1: Measure the Insulation Against the Windows

Step 2: Cut the Insulation
Cut the insulation to your measurements. We suggest using something with a straight edge as a guide when cutting the insulation. Once cut, hold the insulation back up against the window to make sure it fits correctly.
Step 3: Round the Corners

Step 4: Cut Holes for Suction Cups

Step 5: Fit the Suction Cups

Step 6: Repeat for All Windows
